Disclaimer: This guide was automatically translated by AI from the German original. Please verify commands and technical details before using them.
¶ User scripts
I wrote a few scripts for Unraid.
You can find them here: https://github.com/kanuracer/scripts/tree/main/unraid
¶ Shrink an array
Warning: Always create a backup first. The data on removed disks can no longer be read in the array. To be safe, move your data manually or with the unBalance tool.
To shrink an array, first stop the array. Go to the Main/Start tab, scroll all the way down, and click Stop.
Now take screenshots of your disk assignments.

After the array has stopped, go to the Tools tab. Click New Config there.
Then select All under Preserve current assignments and confirm the process.
After that, go back to the Start tab and compare the disk assignments with your screenshots. If everything is correct, remove all disks that should be removed. You can also add new disks.
Now start the array again, but make sure that Parity is already valid is not checked.
¶ Virtual machines
¶ Import a VM
Virtual machines from Hyper-V, VirtualBox, and similar platforms can be imported into Unraid quite easily.
For this you need the virtual disk of your VM. In my case, it was a .vhdx from Hyper-V.
Copy it to your Unraid server and run the following command:
qemu-img convert -p -f vhdx -O raw NAME.vhdx NEWNAME.img
If you have another format such as VHD, simply replace vhdx with your format.
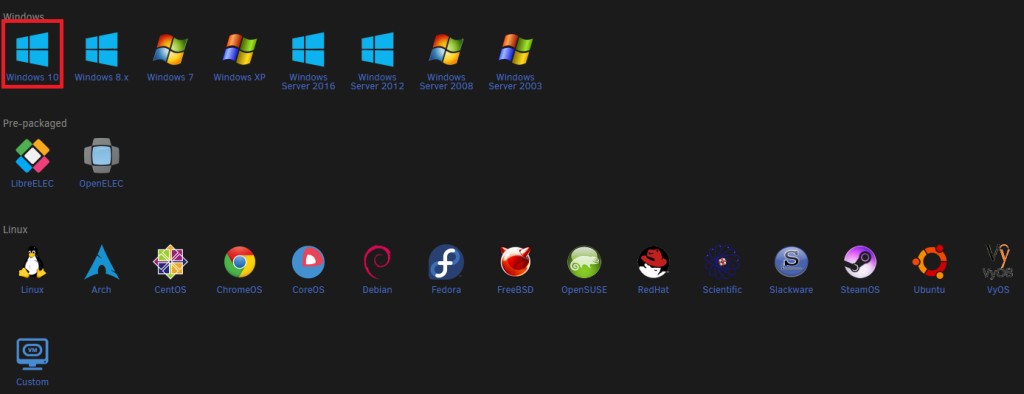
After the virtual disk has been converted, you can import the virtual machine in Unraid under VM.
Click Add VM. In the overview, select the matching operating system.
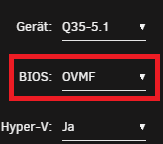
Then you will reach the settings. It is important how your VM was installed back then. If it was installed as UEFI, leave OVMF selected under BIOS. Otherwise, select SEABIOS.
Now you only need to attach the .img. Go to the primary vDisk section, select Manual, and choose the converted vDisk.

After that, you can add and start the VM.
¶ Expand VM storage
The vm.img file is usually a QCOW2 or RAW file that acts as a virtual disk.
-
Stop the VM
Go toVMsin the Unraid web interface, select your VM, and stop it. -
Open a terminal (Unraid Web GUI → Terminal or SSH)
Navigate to the location of the VM images, for example:
cd /mnt/user/domains/YourVM/
- Increase the size of the QCOW2 or RAW image
Depending on the format ofvm.img:
¶ QCOW2:
qemu-img resize vm.img +10G
¶ RAW:
qemu-img resize -f raw vm.img +10G
Note:
+10Gmeans you add 10 GB. Alternatively, use30Gto set the total size to 30 GB.
¶ Nextcloud Docker
¶ What is required?
¶ Docker
- MariaDB – linuxserver
- Nginx Proxy Manager – jc21
- Redis Server – jj9987
- Nextcloud – linuxserver
¶ Other tools
HeidiSQL
WinSCP
A domain that already points to your home network.
¶ Structure of the Nextcloud environment
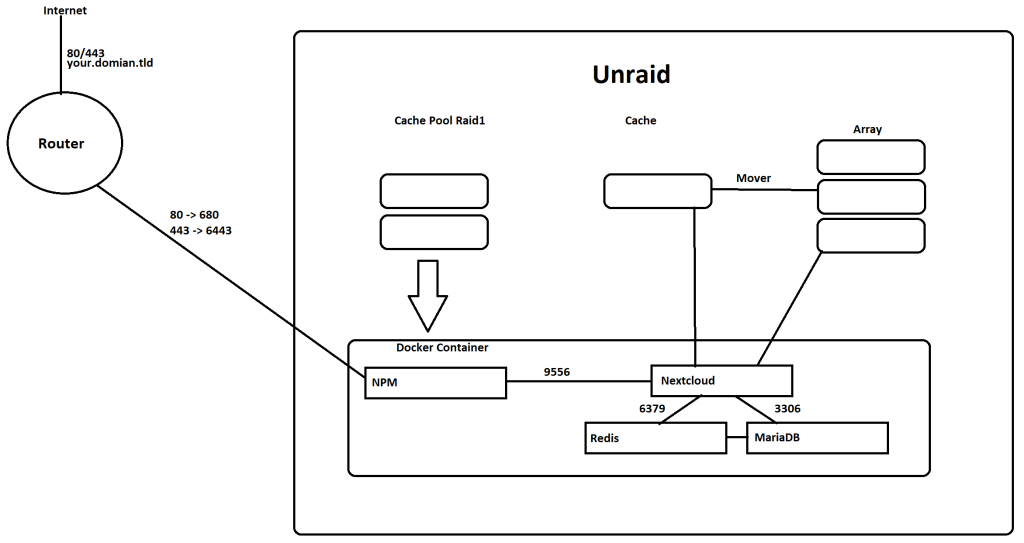
In my Unraid configuration, I have:
2 x 500 GB SATA SSDs as a cache pool in RAID 1 (dovm)
1 x 256 GB M.2 NVMe SSD as a pure write cache (Cache)
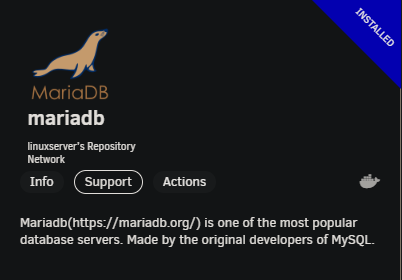
¶ MariaDB
¶ Installation
In Unraid, go to the APPS tab and search for the mariaDB Docker. I recommend the Linuxserver Docker here.
Click Install; you will be redirected to the configuration page immediately.
¶ Configuration
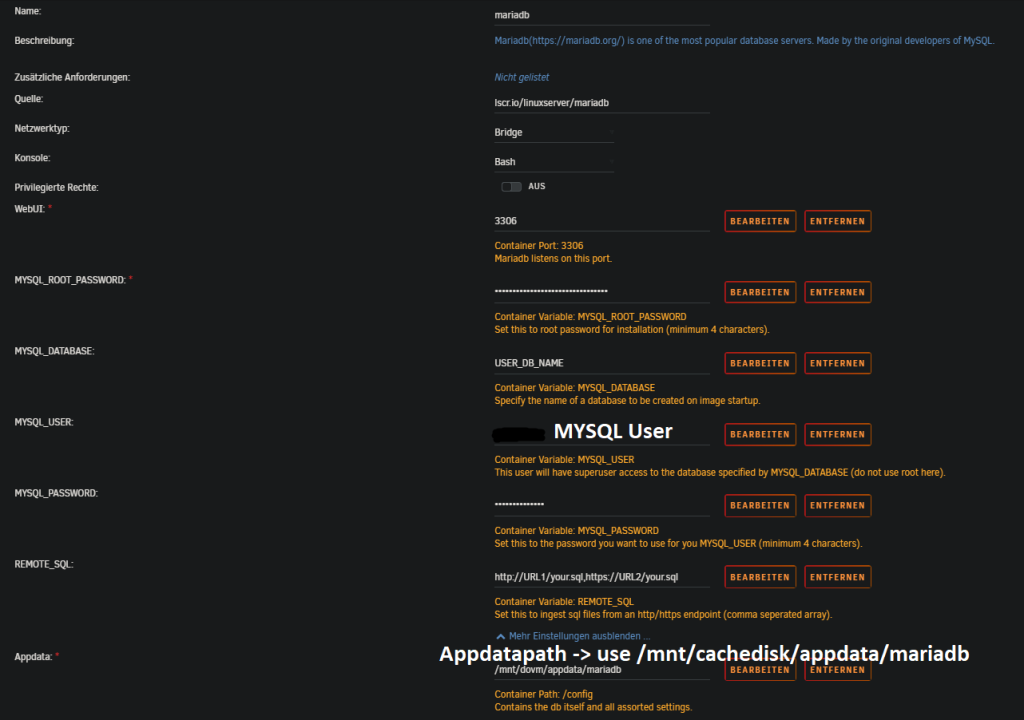
After the Docker container is installed, check again whether it has started.
¶ Create the database connection
Download HeidiSQL and open it:
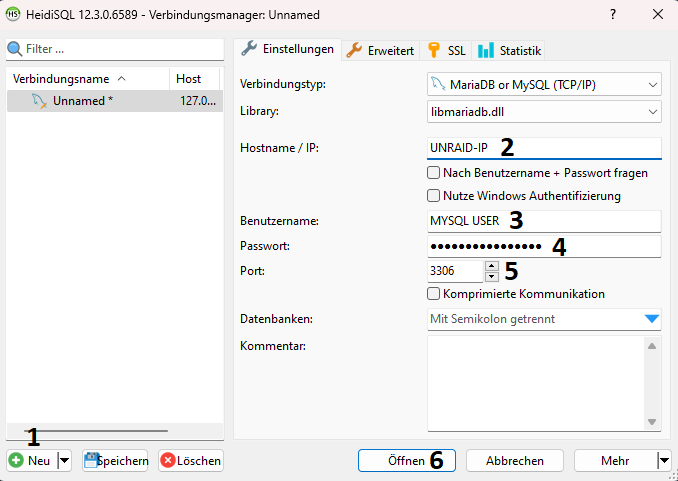
- Create a new connection.
- Enter the IP address of your Unraid server.
- Enter the root user.
- Enter the password you set during Docker installation.
- Enter the port of your MariaDB. 3306 is the default port.
- Open the connection.
¶ Create the database
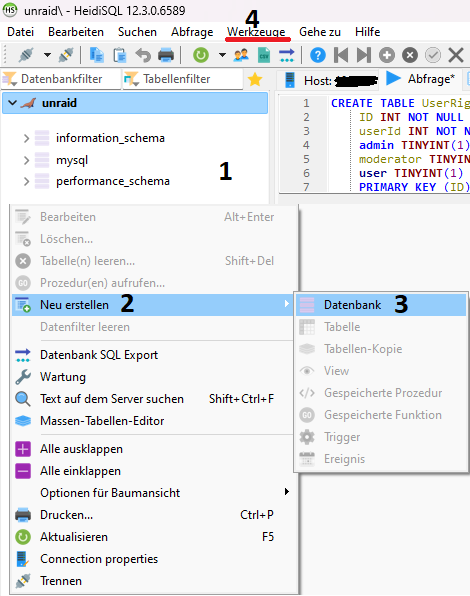
- Right-click in the left panel.
- Click
Create new. - Click
Databaseand enter the name of the database. In this guide I use the namenextcloud. - Click
Tools>User managerin the menu bar.
¶ Create and authorize a user
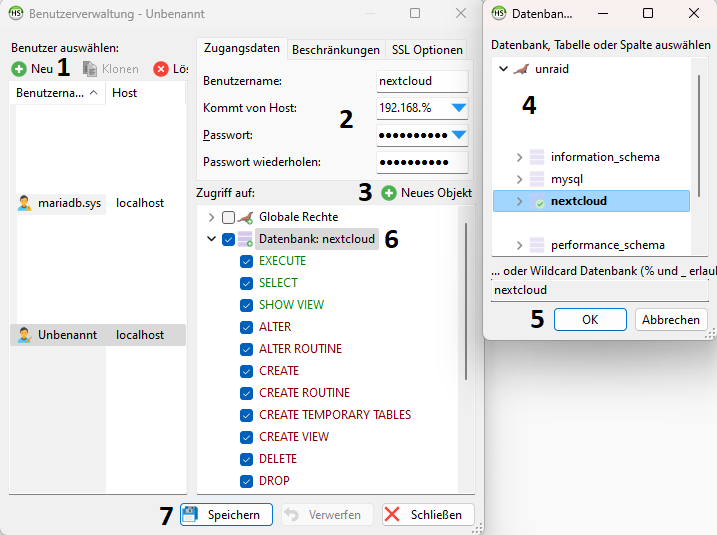
- Click
New. - Enter the username. In this guide I use
nextcloud. SetFrom hostto172.17.%and enter the password. - Click
Add object. - Select the
nextclouddatabase. - Click
OKto confirm your selection. - Grant global permissions on the database.
- Save your settings.
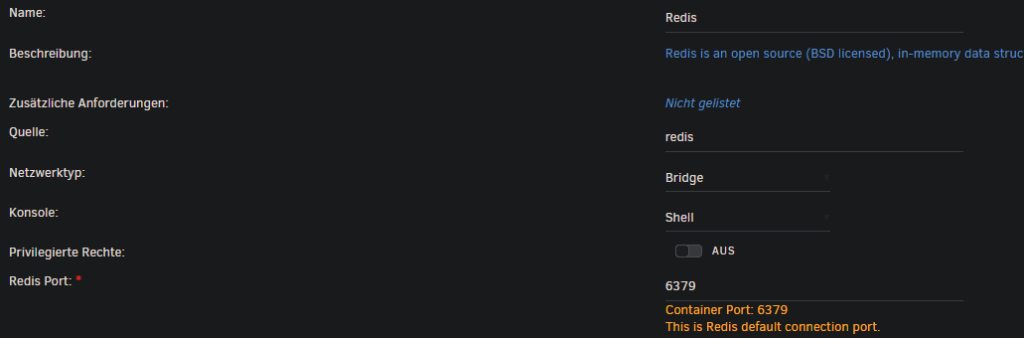
¶ Redis server
To make Nextcloud a little faster, we need a Redis server. Search for Redis again under APPS and install the Docker container from jj9987.

¶ Nextcloud
¶ Create a share
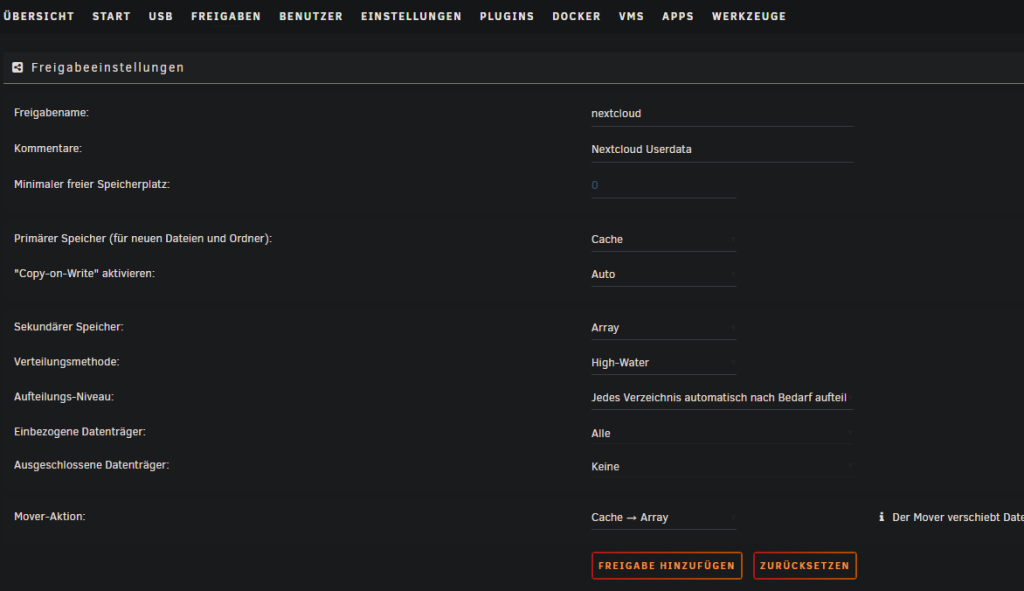
Before Nextcloud can be installed, a share for the user data must be created.
In the Unraid WebUI, click Shares > Add Share. Assign a name. In this guide I use nextcloud.
Select your write cache as primary storage and your array as secondary storage.
All user data is now written to the cache and later pushed to the array by the mover.
¶ Install Nextcloud
Now that the share for user data exists, Nextcloud can be installed.
Search for Nextcloud again under APPS. I again recommend the Linuxserver Docker.
For WebUI, set a port other than 443. In this guide I use 9556.
For Path: /data, enter the share you just created for user data. In my case: /mnt/user/nextcloud/.
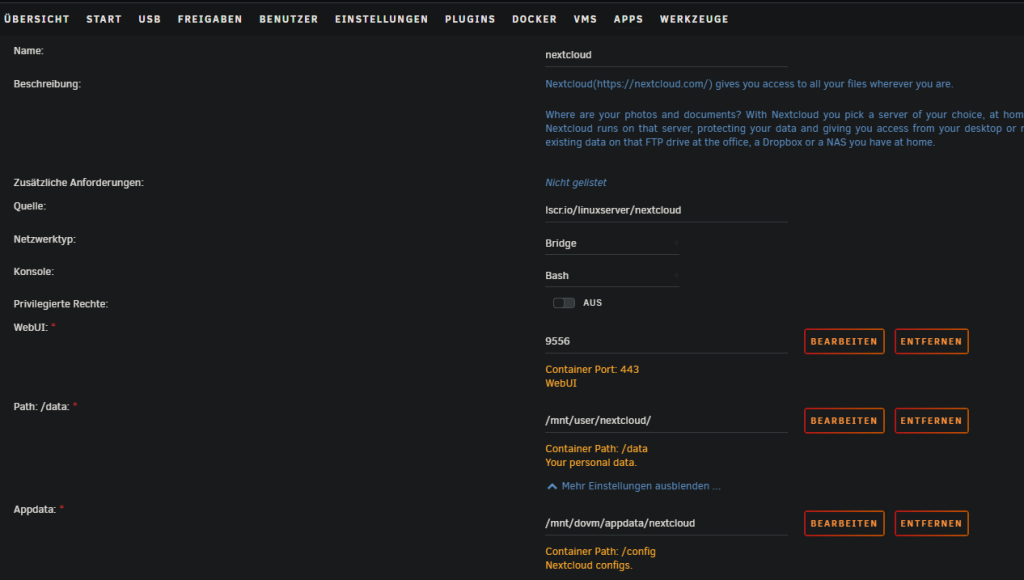
After the Docker container is installed, you can open the WebUI: UNRAID-IP:9556.
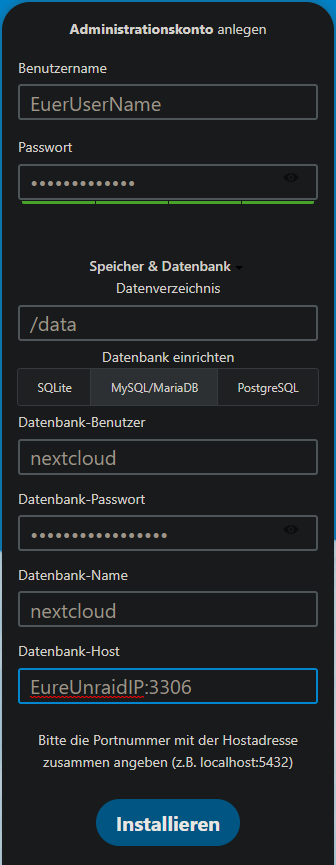
Enter your desired username and password.
Click the Storage & database tab. Leave the data directory as it is. Under database, select MySQL/MariaDB and enter the database, user, and password. The host must be entered as UNRAID-IP:3306.
Then click Install.
If an error appears saying that you cannot connect to the DB, you may need to copy the IP address from the error message and add it to the HeidiSQL user management entry for the Nextcloud user.
¶ Nextcloud errors
After installation, you will see several errors under Administration settings > Overview:
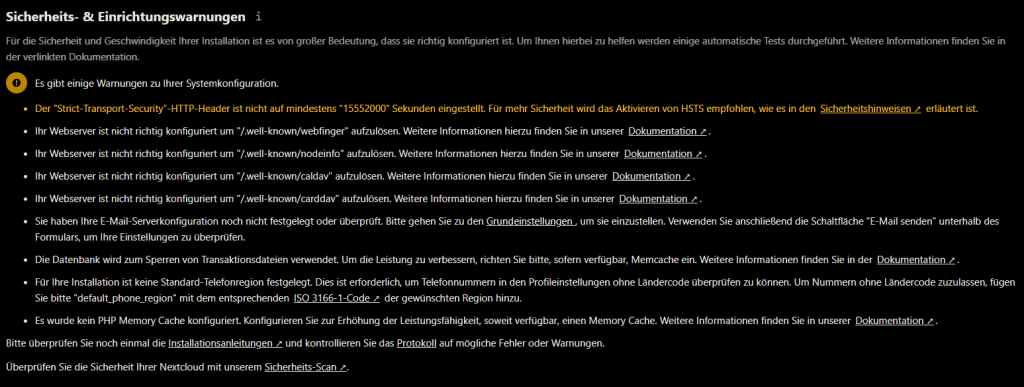
Some can be fixed by adjusting config.php. For this you need WinSCP or a comparable SFTP client.
Connect to your Unraid server via SFTP, navigate to the Nextcloud directory /mnt/user/appdata/nextcloud/www/nextcloud/config/, and open config.php.
Now add or change the following entries:
'memcache.local' => '\\OC\\Memcache\\APCu',
'memcache.locking' => '\\OC\\Memcache\\Redis',
'redis' =>
  array (
    'host' => 'UNRAID-IP',
    'port' => 6379,
    'timeout' => 0.0,
    'password' => '',
  ),
  'overwrite.cli.url' => 'https://your.domain.tld',
  'overwriteprotocol' => 'https',
  'trusted_domains' =>
  array (
    0 => 'UNRAID-IP:9556',
    1 => 'your.domain.tld',
  ),
  'trusted_proxies' =>
  array (
    0 => 'UNRAID-IP',
  ),
  'default_phone_region' => 'DE',
  'mail_smtpmode' => 'smtp',
  'mail_smtpsecure' => 'ssl',
  'mail_sendmailmode' => 'smtp',
  'mail_smtpauthtype' => 'LOGIN',
  'mail_smtpauth' => 1,
  'mail_smtpname' => 'EMAIL-Address',
  'mail_smtppassword' => 'PASSWORD',
  'mail_from_address' => 'cloud',
  'mail_domain' => 'domain.tld',
  'mail_smtphost' => 'smtp.hoster.de',
  'mail_smtpport' => '465',
In the end, the config should look roughly like this. instanceid and similar values will differ from your config:
<?php
$CONFIG = array (
  'datadirectory' => '/data',
  'instanceid' => '',
  'passwordsalt' => '',
  'secret' => '',
  'dbtype' => 'mysql',
  'version' => '27.0.1.2',
  'dbname' => 'nextcloud',
  'dbhost' => 'UNRAID-IP:3306',
  'dbport' => '',
  'dbtableprefix' => 'oc_',
  'mysql.utf8mb4' => true,
  'dbuser' => 'nextcloud',
  'dbpassword' => 'Nextcloudtutorial',
  'installed' => true,
  'memcache.local' => '\\OC\\Memcache\\APCu',
  'memcache.locking' => '\\OC\\Memcache\\Redis',
  'redis' =>
  array (
    'host' => 'UNRAID-IP',
    'port' => 6379,
    'timeout' => 0.0,
    'password' => '',
  ),
  'overwrite.cli.url' => 'https://your.domain.tld',
  'overwriteprotocol' => 'https',
  'trusted_domains' =>
  array (
    0 => 'UNRAID-IP:9556',
    1 => 'your.domain.tld',
  ),
  'trusted_proxies' =>
  array (
    0 => 'UNRAID-IP/24',
  ),
  'default_phone_region' => 'DE',
  'mail_smtpmode' => 'smtp',
  'mail_smtpsecure' => 'ssl',
  'mail_sendmailmode' => 'smtp',
  'mail_smtpauthtype' => 'LOGIN',
  'mail_smtpauth' => 1,
  'mail_smtpname' => 'EMAIL-Address',
  'mail_smtppassword' => 'PASSWORD',
  'mail_from_address' => 'cloud',
  'mail_domain' => 'domain.tld',
  'mail_smtphost' => 'smtp.hoster.de',
  'mail_smtpport' => '465',
);
¶ Nginx Proxy Manager
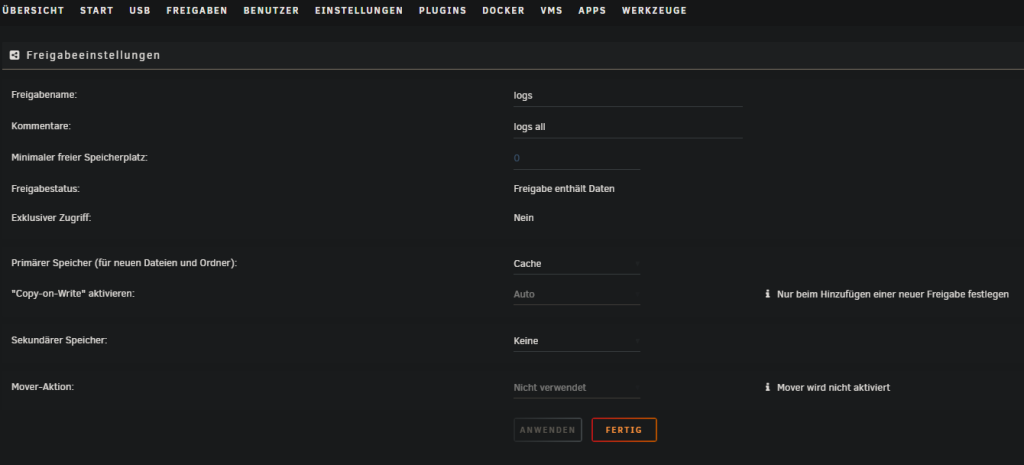
First, create another share.
Go to Shares > Add Share. This share will be used for log files in the future, so name it logs.
To prevent the logs from landing on the array and keeping the disks from going into standby, store the share only on the cache.
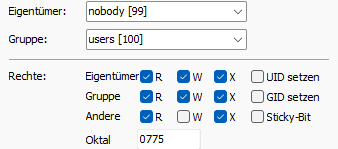
After the share is created, create a subfolder. Use WinSCP again and navigate to /mnt/user/logs/.
Right-click in the directory > New > Folder and name it npm, nginxproxymanager, or something similar.
Then right-click the folder again > Properties and set the permissions as follows:
When that is done, you can start with the proxy.
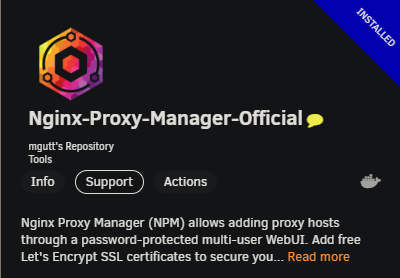
It is again found under APPS. I recommend the Docker container from mgutt here.
Set the settings like in this example:

For the log files, click + Add another Path, Port, Variable, Label or Device at the very bottom and enter the following:
Sometimes Nginx Proxy Manager (NPM) may be ready faster than the Nextcloud application during startup. This can cause Nextcloud to be unreachable after a server restart even though everything is running correctly. To fix this, open Advanced View for Nginx Proxy Manager in the Unraid Docker overview and set a wait time value of 60 seconds. With this setting, NPM waits 60 seconds after an Unraid restart, which ensures that all services are started correctly and Nextcloud can be reached smoothly.

When the proxy is finally running, port forwarding still has to be configured.
¶ Port forwarding
I use a Fritzbox 6660 myself, so this example only applies to the Fritzbox:
Log in to the Fritzbox web interface, go to Internet > Permit Access > Port Sharing.
Add a new device here. Under device, select your Unraid server and then click New Sharing at the bottom.
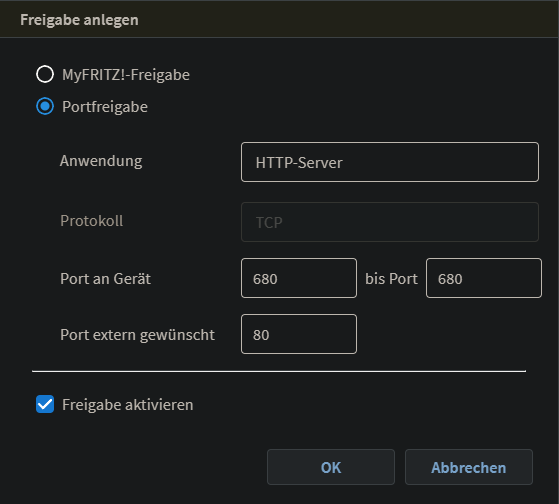
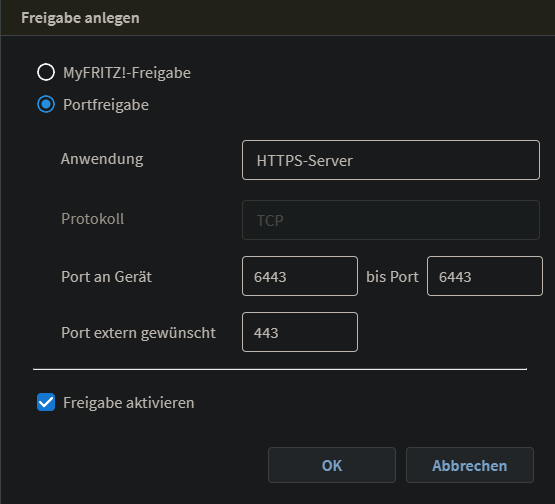
After the port forwards are enabled and saved, continue with the proxy.
The WebUI is required for this. To access the WebUI, enter UNRAID-IP:81 in your browser.
Enter the default login:
admin@example.com
changeme
You should then be prompted to change this data. If no prompt appears, you can also change the data in the top right.
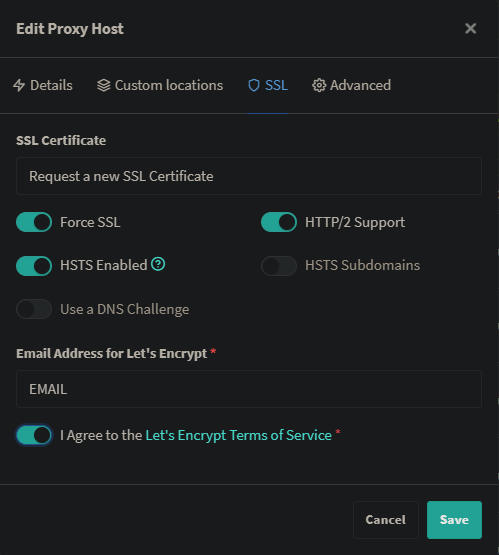
Click Hosts > Proxy Hosts in the WebUI and then click Add Proxy Host on the right side. Configure it as follows:
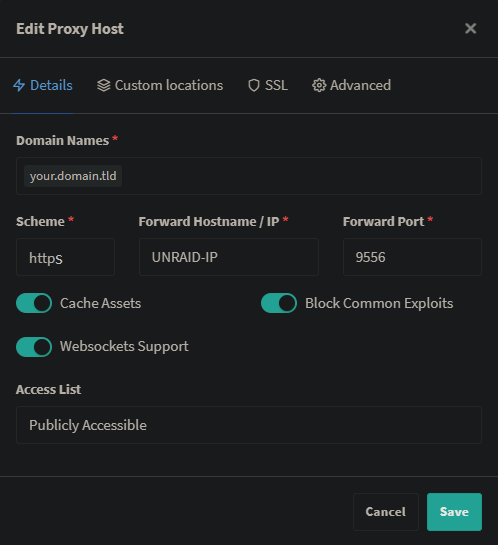
Cache Assets should no longer be enabled.
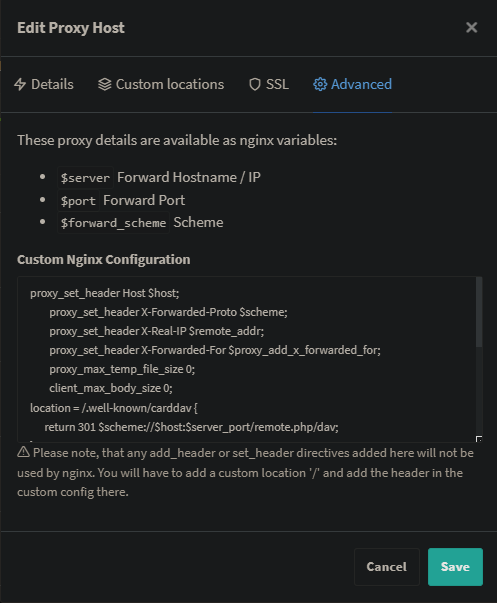
proxy_set_header Host $host;
proxy_set_header X-Forwarded-Proto $scheme;
proxy_set_header X-Real-IP $remote_addr;
proxy_set_header X-Forwarded-For $proxy_add_x_forwarded_for;
        proxy_max_temp_file_size 0;
client_max_body_size 0;
location = /.well-known/carddav {
      return 301 $scheme://$host:$server_port/remote.php/dav;
}
location = /.well-known/caldav {
      return 301 $scheme://$host:$server_port/remote.php/dav;
}
location ^~ /.well-known {
location = /.well-known/carddav     { return 301 /remote.php/dav/; }
location = /.well-known/caldav      { return 301 /remote.php/dav/; }
location ^~ /.well-known            { return 301 /index.php$uri; }
try_files $uri $uri/ =404;
  }
Now restart Nextcloud and all errors are fixed.
¶ Further optimizations for Nextcloud
¶ Move log files
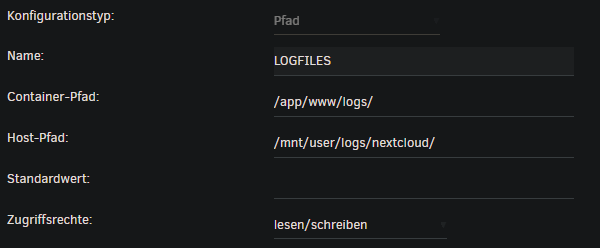
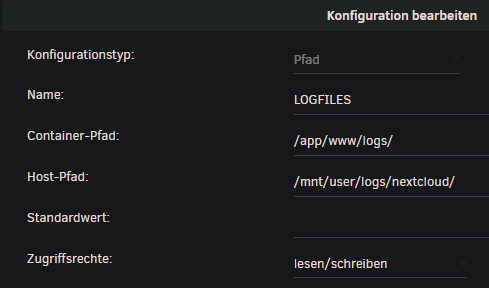
Create another folder under logs for this. Open /mnt/user/logs/ again in WinSCP and add a folder named nextcloud. Then right-click the folder > Properties and assign the following permissions:

Open the Docker terminal (click the Nextcloud Docker icon > Console) and enter the following command:
mkdir /app/www/logs
The path still has to be passed into the Docker container in the Docker configuration.
You can find this at the very bottom under + Add another Path, Port, Variable, Label or Device.
Then add two more lines to config.php:
'loglevel' => 0,
  'logfile' => '/app/www/logs/nextcloud.log',
¶ Automatically empty trash: files older than 7 days after 7 days
Add these two lines to config.php:
'trashbin_retention_obligation' => '7, 7',
  'versions_retention_obligation' => '7, 7',
¶ Maintenance window
Add the following to config.php:
'maintenance_window_start' => 2,
¶ External uploads larger than 512 MB
For this, the client max body size value must be adjusted in this config: /mnt/user/appdata/nextcloud/nginx/site-confs/default.conf.
Change client_max_body_size 512M; to client_max_body_size 0;.
¶ Raise PHP limits
To raise PHP limits such as upload limit, memory limit, and max file size, a few variables must be set in the Docker configuration. You can find them at the very bottom under + Add another Path, Port, Variable, Label or Device.
Set the following variables:
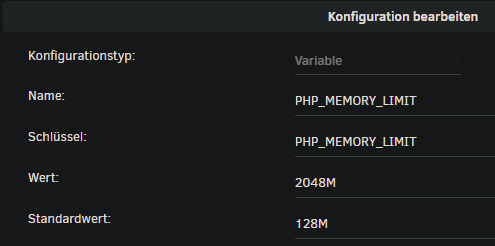
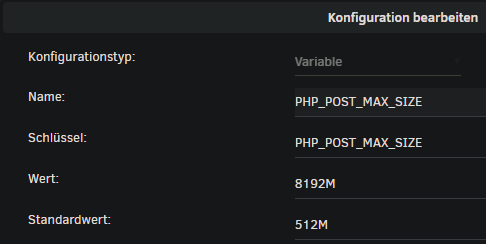
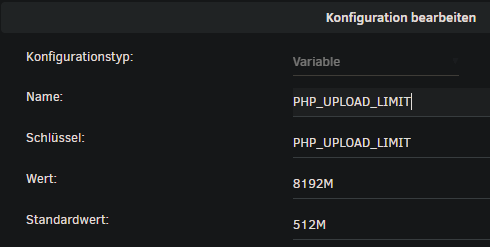
Then click Apply.
¶ Offline backup of flash drive / boot drive
If you want to back up your boot stick without Unraid Connect, you only need to install the User Scripts plugin.
After that, create a new script with the following content:
The script can be found on GitHub.
Then adjust the script header:
# ----------------------------
# Change
# ----------------------------

# backup destination
BACKUP_DEST="/mnt/user/backup/boot/"
# LOG directory
LOG_DIR="/mnt/user/logs/backup"
# Tempfiles directory
TEMP_DIR="/mnt/user/backup/temp/"
# backups to keep
MAX_BACKUPS=3
# zip-password
PASSWORD="password"
Then set the cron schedule, for example hourly.